This guide explains how to set up the GivEnergy AECC Multi-Connect Dongle, used on All in One 2, Gateway 2, and Gen 4 inverters. The dongle supports LAN, WiFi, Bluetooth, and 4G fallback and must be configured before your system can come online.
Before You Begin
- Ensure the inverter or gateway is powered on.
- Have the customer’s WiFi name and password available.
- Ensure you are close enough to the dongle during setup.
Step 1 – Connect to the Dongle’s Hotspot
The dongle broadcasts its own temporary WiFi network, e.g. WN2535G070. There is no password on first use.
If the SSID appears locked, factory reset the dongle by holding the reset button for 10 seconds.
Reset Button Locations
- Gateway 2: Top centre of the unit
- All in One 2: Top right of the DC isolation area
- Gen 4: Bottom centre of the inverter front
After connecting, your device may warn that “No Internet is available.” This is normal — continue to the next step.
Step 2 – Access the Dongle Interface
Open a web browser and go to:
https://10.10.100.254/web/info
Accept any browser warnings to proceed to the login page.
- Username: admin
- Password: 123456
You will be prompted to change the password. Your new password must include letters and numbers, e.g. admin123456.
Important: Do not accidentally type the new password into both the username and password boxes.
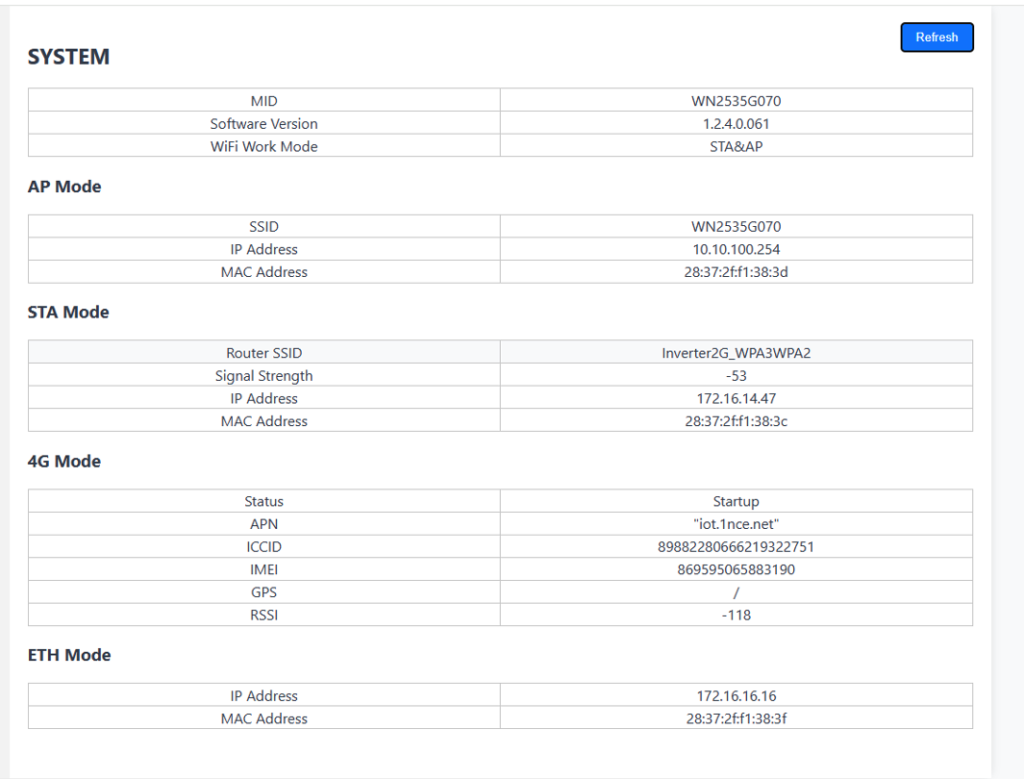
Step 3 – System Page Overview
After logging in, you will start on the SYSTEM page. Here you can view:
- WiFi status
- LAN (Ethernet) connection status
- 4G connectivity
- Current software version
Step 4 – Connecting the Dongle to WiFi
Select STA Settings from the menu.
1. Choose a WiFi Network
Press Choose and select the customer’s WiFi SSID.
2. Enter the WiFi Password
Enter the password carefully (case-sensitive, symbols must match exactly).
3. Select the Authentication Mode
- WPA2-PSK – Most common
- WPA3 – Some modern routers
Leave all other settings unchanged and press Save.
Verifying WiFi Connection
Go back to the SYSTEM page. If the STA section is empty, press Refresh.
- If you see the Router SSID but no IP address or signal strength → check the password.
- If you see SSID, Signal Strength, and an IP → connection successful.
Step 5 – Secure the Dongle Access Point
The dongle’s local access point is not secured by default. You must secure it.
Select AP Setting.
Recommended Settings
- AuthMode: WPA2-PSK (or WPA3 if preferred)
- Password: Set a secure password
- SSID Hidden: Optional
- Channel: Auto
Do not modify any other settings.
DO NOT leave the dongle unsecured.
Step 6 – Other Settings
Bluetooth
Bluetooth is enabled by default and used for installer app commissioning.
Software Upgrade
This page allows firmware updates for the dongle. Only update when instructed by GivEnergy, as factory versions are fully tested.
Final Behaviour – Connection Priority
The dongle follows a connection hierarchy:
- 1. LAN – Primary connection if a cable is plugged in
- 2. WiFi – Used when LAN is not available
- 3. 4G – Backup option for remote diagnostics
4G should not be used for routine operation. It is a fallback only.
Setup Complete