Introduction
This guide is designed to help GivEnergy installers and customers identify and resolve common issues related to EV charger setup, connectivity, and operation. It provides clear, step-by-step troubleshooting methods that can be carried out safely and efficiently. This guide can be used alongside the Error List in the Portal via givenergy.cloud, as this list contains guides that can help solve common issues.
Objectives
After completing this guide, readers will be able to:
- Understand the key factors that affect EV charger connectivity and operation.
- Identify common causes of charging or network related failures.
- Perform safe and effective troubleshooting checks.
- Know when to escalate issues to GivEnergy Support.
Troubleshooting
Please Note
While the steps in this guide are completely safe to perform, it’s important to exercise caution when working around electrical systems. Only follow the procedures described here. Do not attempt to open, modify, or interfere with any part of the charger casing, internals, or wiring.
If at any point you are unsure, uncomfortable, or the problem persists after following this guide, stop immediately and seek assistance from your qualified installer or GivEnergy Support.
EV chargers are connected to high-voltage systems and network infrastructure. Always ensure isolators are used correctly and never attempt to disassemble or repair internal components yourself.
Common Issues & Symptoms
Symptom – Charger Offline
Possible Causes –
Weak Wi-Fi, LAN issue, tamper switch triggered, WiFi extender or mesh network incompatibility
Symptom – Charger Not Charging Car
Possible Causes –
Communication pin (CP) voltage/duty cycle incorrect, vehicle issue, charger not recognising load
Symptom – Charger Charges Too Slowly
Possible Causes –
Car limiting power, low SoC, ambient temperature, charge cable rating
Symptom – Charger won’t go online after install
Possible Causes –
DNS/router blocking, WiFi Extender or mesh network incompatibility
Symptom – Charger stuck in CT mode
Possible Causes –
Incorrect config, system not detecting meter
Symptom – Car plugged in, not charging
Possible Causes –
CP voltage/duty cycle incorrect (53% = car not requesting charge)
Symptom – Wi-Fi connected but no data
Possible Causes –
IP conflict, firewall/port block, weak signal
Symptom – Repeated connection drops
Possible Causes –
Tamper misalignment, internal fault, poor power supply
Safety and Visual Checks
Before diving into technical steps:
- Power off the charger at the consumer unit before handling.
- Inspect the charging cable and socket for damage, debris, or corrosion.
- Confirm the dedicated EV charger breaker is ON and no RCD/MCB is tripped.
- Check the tamper switch inside the charger (lid must be fully sealed).
- Ensure GivEnergy Cloud Portal doesn’t show tamper triggered.
- Once these checks are completed and it is safe to do so, power on the charger.
Network Checks (Wi-Fi LAN)
Wi-Fi:
- 2.4GHz and 5GHz networks compatible.
- GivEnergy EV chargers are not compatible with Eero 6E mesh network extenders. We suggest switching to LAN or 2.4GHz-only guest SSID if you have these.
- Wi-Fi name (SSID) must not have spaces or special characters.
- Check if device shows up on the router admin page.
- Set up a static IP reservation and open port 7654 or 7655 (check both, only one is used).
LAN:
- Use a known working port in home router or compatible LAN extender
- Use RJ45 cable tester to verify wiring.
- If using PoE injectors or switches, test without them.
- Test on direct router connection, avoiding extenders or mesh units.
- Some Eero setups will block the charger even with firewall rules request customer to confirm router model.
Use a Hotspot for Testing
To rule out home network issues, temporarily connect the charger to a mobile hotspot (if supported). If it works via hotspot, the issue is likely with your router or firewall settings.
Charger Configuration Check
Please log into your Cloud Portal account via givenergy.cloud or GivEnergy App
- Go to Settings > Other and confirm EV charger is set to the correct Mode
- Ensure Local Control = OFF (unless using Modbus control).
- If the charger is set to Solar Only, ensure surplus is being exported and CT clamps are installed correctly. Contact your installer if you’re unsure about this.
Charger Configuration Types (A-D)
GivEnergy EV Chargers support four configuration types, each designed for a specific installation scenario. Selecting the correct config ensures optimal performance and compatibility with other on-site equipment.
- Standalone (No CTs or Solar)
The charger operates with mains power and internet connectivity only. Ideal for grid only charge. - No solar integration, CTs, or energy monitoring.
- Basic smart features like scheduling are available via the app.
Standalone With PV
- Similar to Standalone mode, but installed on sites with third-party solar systems.
- No direct integration with solar inverter or monitoring equipment.
- Allows basic charging functionality with manual control.
CT Meter
- Charger is connected to a compatible CT meter via a wired comms cable.
- Enables dynamic load balancing, solar export detection, and other smart charging features.
- Suitable for sites where full GivEnergy integration is not available.
Inverter Control Cloud
- Charger is installed alongside a compatible GivEnergy PV inverter that is registered under the same GivEnergy cloud account.
- Enables full dynamic control and scheduling based on inverter data.
- No physical connection to the inverter is needed — communication occurs over the cloud.
- Recommended for most residential GivEnergy solar setups.
Inverter Control Local
- Charger is hardwired to a compatible GivEnergy PV inverter using a comms cable.
- Full real-time data exchange and dynamic charging control.
- Typically used where a cloud link is unavailable or offline communication is required (e.g., sites without stable internet).
Additional Troubleshooting Tips for Customers
Charger Disconnected (network unchanged)
Try a Reboot
- Turn off the charger at the consumer unit (fuse board).
- Wait 30 seconds, then turn it back on.
- Allow up to 5 minutes for the charger to reconnect to the internet.
Check Your Vehicle Settings
Some EVs (e.g. MG4, VW ID series) have smart charge schedules or delays.
- Open your vehicle app or infotainment screen and check if charging is set to start later.
- Try disabling “Scheduled Charging” to test immediate charging.
Scheduled Charge Not Working
If a Scheduled Charge is not operating correctly, try a manual charge:
- In the GivEnergy app, go to EV Charger → Control and try to manually start a charge.
- Confirm the charger shows a valid status such as “Connected” or “Idle.”
- If the app shows “Offline,” check your Wi-Fi or LAN connection.
- If a manual charge works, but scheduled charge goes not, then the EV charger local time zone may be incorrect. Try deleting the schedule and setting again. If the charger does not adhere to the scheduled charge after this step please contact support@givenergy.co.uk
Scheduled Charging Conflicts
- If both your car and the GivEnergy app have charge schedules enabled, they may conflict and stop the charge from starting.
- Try disabling one schedule to test immediate charging.
Understanding the LED Status Lights
- Green (solid): Ready
- Blue (solid): Charging
- Flashing Blue: Waiting for vehicle
- Flashing Red: Fault, tamper alert, or lost connection
If you see a flashing red light, contact your installer or GivEnergy Support.
Check for Tamper Trigger
If the charger’s front cover is not fully sealed or the tamper switch is misaligned, the charger may disable itself as a safety measure.
Your installer can easily check and reseat the tamper switch if needed.
Check Cable Compatibility and Condition
If you’re using a third-party charging cable, ensure it supports the correct amperage (e.g. 32A).
Visually inspect both ends of the cable for dirt, rust, or bent pins — these can prevent a proper connection.
Check for Software Updates
- Open the GivEnergy app and go to the charger settings.
- If a firmware update is available, apply it and restart the charger afterwards.
Avoid Overlapping Wi-Fi Names
If you have multiple Wi-Fi networks at home (e.g. a guest network or mesh system), make sure your charger is connected to the correct one.
Avoid naming multiple networks with the same SSID — this can confuse the charger and cause dropouts.
Check If Octopus API or Other Smart Tariff Control Is Active
- If you’re using an energy provider like Octopus, make sure any linked control (e.g. via API or third-party app) isn’t overriding the charger’s behaviour.
- Temporarily disable smart charging controls in the Octopus or third-party app to test manual charging.
- If the charger works after this, the issue is with the smart tariff settings — not the charger itself.
Confirm the Correct Configuration Mode Was Selected During Commissioning
If the charger is in the wrong config mode (e.g. CT Meter when no CT is installed), it may not function properly. Check with your installer if the system has never worked correctly since install.
My Car Stops Charging at 80%, Is That Normal?
Some EVs have a setting to stop charging at 80% by default (to protect battery health).
Check your vehicle’s charge settings or mobile app to see if a charge limit is set — especially on new cars like MG4, Tesla, or VW ID series.
Intermittent Charging
If your charger starts and stops repeatedly, ask your installer to check the power supply and breaker stability. A loose connection or voltage dip can cause the charger to reset.
Ask Your Installer to Confirm the CT Clamp Orientation
For solar-linked setups, the CT clamp must be installed in the correct direction around the cable. If installed backwards, the charger may misread export/import values and fail to charge when solar is available.
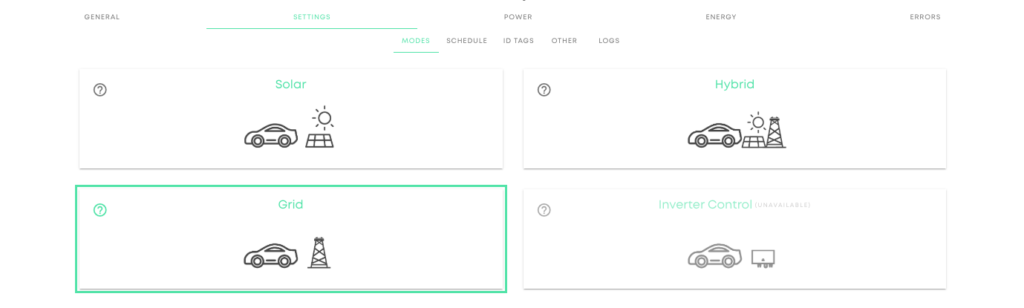
Control where your EV Charger chargers from
Log on to the Portal (givenergy.cloud) and expand your EV Charger, under the Settings tab you can choose the Mode for charging. These options allow you to choose whether your EV Charger charges from your Solar set up, from the Grid or your Inverter if you have Inverter Cloud Control turned on. By clicking Grid, you can ensure that your EV Charger does not discharge your battery, if you have one set up.
EV Charger Fault Codes
Code – E001
Description – Over Current Fault
Common Causes / Notes – Car is requesting more current than allowed. Could be a faulty vehicle onboard charger or misconfigured charge limit.
Code – E002
Description – Under Voltage Fault
Common Causes / Notes – Grid voltage too low. Check site voltage supply and grid stability.
Code – E003
Description – Over Voltage Fault
Common Causes / Notes – Grid voltage too high may happen during solar export. Check CT direction, inverter config, or DNO supply.
Code – E004
Description – Earth Fault
Common Causes / Notes – Earth connection lost or detected leakage. Test earth integrity, check bonding, or insulation issues.
Code – E005
Description – Over Temperature Fault
Common Causes / Notes – Charger too hot. Could be due to ambient temp, direct sunlight, poor airflow, or faulty temp sensor
Code – E006
Description – Relay Fault
Common Causes / Notes – Charger failed to close or open internal relay safely. Could indicate hardware fault or contactor sticking.
Code – E007
Description – CP (Control Pilot) Fault
Common Causes / Notes – Communication with EV failed. Most commonly caused by poor cable connection, CP pin damage, or incompatible EV.
Code – E008
Description – Plug Lock Fault (for socketed units only)
Common Causes / Notes – Internal lock mechanism failed. Ensure plug is seated properly or test locking pin.
Code – E009
Description – Communication Error with Internal Module
Common Causes / Notes – Internal board-to-board communication issue — may need inspection or RMA.
Code – E0010
Description – CT Comms Fault (in CT Meter Mode)
Common Causes / Notes – CT meter not detected or wired incorrectly. Check RS485 wiring and CT orientation.
Code – E0011
Description – Internet / Cloud Communication Failure
Common Causes / Notes – Charger cannot connect to GivEnergy servers. Check LAN/Wi-Fi, port 7655, router compatibility
Code – E0012
Description – Over Current Fault
Common Causes / Notes – Car is requesting more current than allowed. Could be a faulty vehicle onboard charger or misconfigured charge limit.
Code – E001
Description – Over Current Fault
Common Causes / Notes – Car is requesting more current than allowed. Could be a faulty vehicle onboard charger or misconfigured charge limit.
Code – E001
Description – Over Current Fault
Common Causes / Notes – Car is requesting more current than allowed. Could be a faulty vehicle onboard charger or misconfigured charge limit.
Code – E001
Description – Over Current Fault
Common Causes / Notes – Car is requesting more current than allowed. Could be a faulty vehicle onboard charger or misconfigured charge limit.